A Complete Guide to Patch an Air Mattress While Traveling in 5 Simple Steps
Air mattresses are a good way to spend the night away from home with comfort and peace. that being said, this gadget is often used by people who are camping in distant places and they need a sound sleep such as they do in their houses.
But, the problem with getting an air mattress is that it can leak anytime soon and that’s where the issue begins. So, with leakage, even if you inflate it completely, it will become a pain for you to sleep on it due to uneven surfaces.
Hence, a question arises here that how can one patch an air mattress applying different steps? That’s the main reason I am writing today, i.e. to patch an air mattress effectively.
So, let’s take a look at some of the steps sequentially involved in this process:
5 Steps to Patch An Air Mattress Effectively:
The complete process is divided into 5 steps that are as follows:
- Determine Whether There is a Leakage or Not:
This step is simple and it helps to make sure that either there is a leakage present or not in the air mattress that you are about to use. So, for this purpose, inflate the air mattress you have got to its fullest. Right after that, you will need to lean on your mattress and see whether it becomes saggy or not. If there is a leakage, the mattress will go down an inch right after you lie on it.
Many professionals will recommend that you check out the leakage issue one day before you leave for a trip. One other way to make sure that it isn’t leaked is to inflate the mattress and place a heavy weight on it. Leave it then for like 3 to 4 hours and come back to see whether there is a change in the original shape of the air mattress.
That’s how you are going to determine the leakage in the process of patching an air mattress.
- Filling The Spray Bottle With Liquid Slip:
If you are in doubt that there might be a leak in the air mattress you have, then you should apply the next step which is making a mixture of liquid soap with water. For this purpose, you need to select a spray bottle, fill a little amount of water in it along with liquid soap and then shake it gently.
The water, on the other hand, will get mixed with the soap and will form a liquid with bubbles. This liquid solution is going to make sure that whether there is a leak in your air mattress or not.
- Spraying the Air Mattress to Find a Leak:
The next step we are going to follow will be the spraying process to make a patch in an air mattress perfectly. For this purpose, it is recommended that you first spray only a small portion of the mattress with the liquid spray. How are you going to determine the leak? The solution is simple. You should look out for soap bubbles in that area where the liquid soap solution has been sprayed.
Mark all those areas that you think are making bubbles because these are the areas that you will need to repair right after deflating the air mattress. A permanent marker is a good choice to mark all leaked areas one by one on your air mattress.
- Drying The Leaked Area and Applying Liquid Sealer:
Well, right after marking the leaked area, the next step will be to dry it. You can do this by using a soft cloth. Make sure that the spot you are trying to patch is completely dried or else the path won’t be effective at all.
Liquid sealer is something you can find in the patch kit of air mattress easily. So, right after you are done with drying the spot, the next step would be brushing liquid sealer on the marked area. There should be at least four to five coats of liquid sealer on the leaking area. Before applying each coat, you must wait for the sealer to dry first.
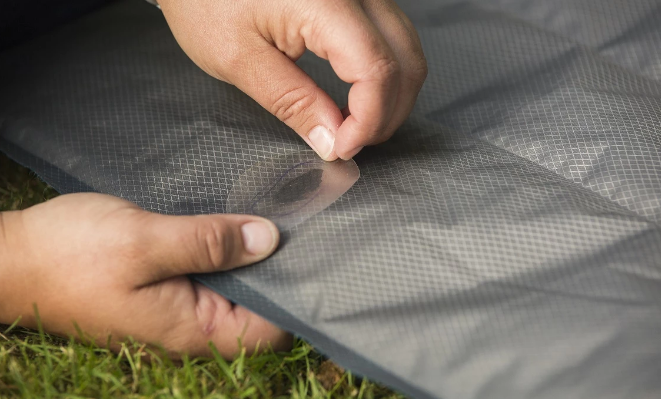
- Cutting and Applying the Patch:
Last but not least, the last nail in the coffin will be applying the patch. For this purpose, the recommendation is to cut down the patch according to the type of leakage area. Apply the patch on the leaking area of the air mattress and brush sealer on it right after that. Now that the leaking area is completely closed, you will be inflating the mattress yet again to see whether the patch is working fine or not.
Some Last Words:
You can also repeat the steps if you think that there are more than one leaking areas in your air mattress. Patching it will help the mattress regain its shape and you will be able to get comfortable and peaceful sleep from it as well.
Good Luck!!